How to Set a QR Code Payment Method in a Vending Machine | Tutorials
Cashless and QR-based payments are no longer a “nice to have” in vending; they are rapidly becoming the standard. In the U.S., a majority of vending transactions now occur via card, mobile wallet, or app-based payments rather than coins or bills.
QR code payments (often bundled with tap-to-pay and mobile wallets) improve customer convenience, increase sales volume, and reduce cash-handling risk.
How QR Code Payments Work in Vending Machines
Despite the name, most “QR vending payments” are part of a cashless reader ecosystem rather than a standalone printed QR code.
- The customer selects a product.
- The machine displays a payment prompt on the cashless reader.
- The customer either:
- Taps a card or mobile wallet (Apple Pay, Google Pay), or
- Scans a QR code displayed on the reader screen (PayPal, Venmo, app-based wallets).
- The payment processor authorizes the transaction.
- The reader sends a vend signal to the vending machine’s control board.
- The product is dispensed.
From the machine’s perspective, a QR payment behaves exactly like a successful card swipe.
How to Install QR Code Payments?
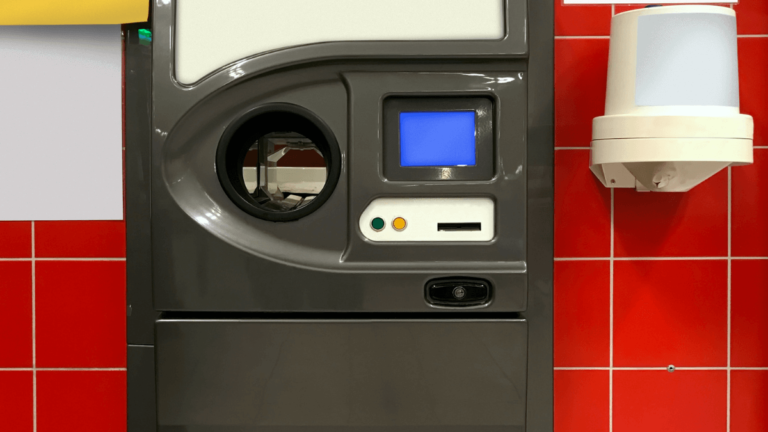
Step 1: Choose a Cashless Reader
Select a cashless payment reader that supports:
- Credit/debit cards
- NFC mobile wallets
- QR code payments
Common U.S. options include systems from Nayax, Cantaloupe (formerly USA Technologies), and similar providers.
Typical hardware cost is $350–$400 per machine.
Step 2: Confirm Machine Compatibility
Most vending machines manufactured in the last 10–15 years support MDB (Multi-Drop Bus), which is the industry standard for cashless upgrades.
If your machine supports MDB, installation is usually straightforward.
Older machines may require a pulse or executive protocol adapter, controller board upgrade, and professional installation assistance.
Step 3: Physical Installation
Power off and unplug the machine
Next, remove or bypass the bill acceptor/coin mechanism if desired. Then mount the cashless reader on the front panel or door.
Lastly, use an adapter plate if no factory cutout exists.
Step 4: Electrical & Data Connections
Connect the reader to the machine’s MDB port (or adapter)
Next, install the telemetry module if separate and attach the antenna and SIM card (for cellular models).
Step 5: Software Setup
Register the device in the provider’s online dashboard. Now Link your merchant account or payment wallet.
Set product prices and tax rules.
Step 6: Testing
You can now power on the machine.
Perform test transactions using the card, mobile wallet, and QR scan
Lastly, verify correct vending and reporting.
Hardware & Software Requirements
Typical components include:
- Cashless reader with QR/NFC support
- Telemetry or communication module
- MDB or pulse interface cable
- Cellular SIM or Wi‑Fi connection
- Online management dashboard
Optional but recommended:
- High-gain antenna for weak signal locations
- Remote monitoring and inventory software
| Category | Details |
|---|---|
| DIY Installation – Upfront Costs |
Cashless reader: $350–$400 Cables & accessories: $10–$30 |
| DIY Installation – Ongoing Costs |
Monthly service fee: $0–$10 Transaction fees: ~2%–3.5% |
| DIY Installation – Best Fit |
Comfortable with basic wiring Operating multiple machines Minimizing long-term operating costs |
| Professional Installation – Additional Costs |
Installation labor: $75–$150 per machine Possible revenue sharing or higher monthly fees |
| Professional Installation – Best Fit |
Older or non-standard machines Zero setup time requirement Preference for bundled support and monitoring |
| Retrofitting Older Machines |
Modern MDB machines: Plug-and-play Pre-MDB machines: Adapters or controller replacement 20+ year machines: Often not cost-effective |
| Upgrade vs Replacement Decision | Operators commonly compare retrofit costs against replacing the machine with a cashless-ready model. |
| New Machines with Cashless Built-In | Many new vending machines ship cashless-ready or with QR and card readers pre-installed. |
| Typical Price Ranges (U.S.) |
Entry-level: $4,000–$5,000 Mid-range smart machines: $6,000–$8,000 Fully featured: $10,000–$12,000+ |
| Supported Payment Methods |
Credit and debit cards Mobile wallets QR-based app payments Remote monitoring and reporting |
| Transaction Fees |
QR payments: ~2.3%–3.5% + small fixed fee Card payments: ~2.6%–3.0% + $0.10–$0.15 |
| Taxes & Compliance |
Sales tax rules remain unchanged Tax applies to the product, not the payment method Automated tax configuration is commonly available No additional or QR-specific taxes apply |
Adding QR code payments to vending machines is a proven way to modernize operations and increase revenue.
When implemented correctly, QR and mobile payments quickly pay for themselves through higher usage and improved customer satisfaction.